The Baked Teriyaki Chicken of My Childhood—Charred, Sticky, and Irresistibly Savory-Sweet
Few foods are as nostalgic to me as chicken teriyaki. I grew up eating my Japanese-American mom’s recipe, and to this day, the sweet, umami-packed punch of teriyaki takes me straight back to my family’s dinner table.
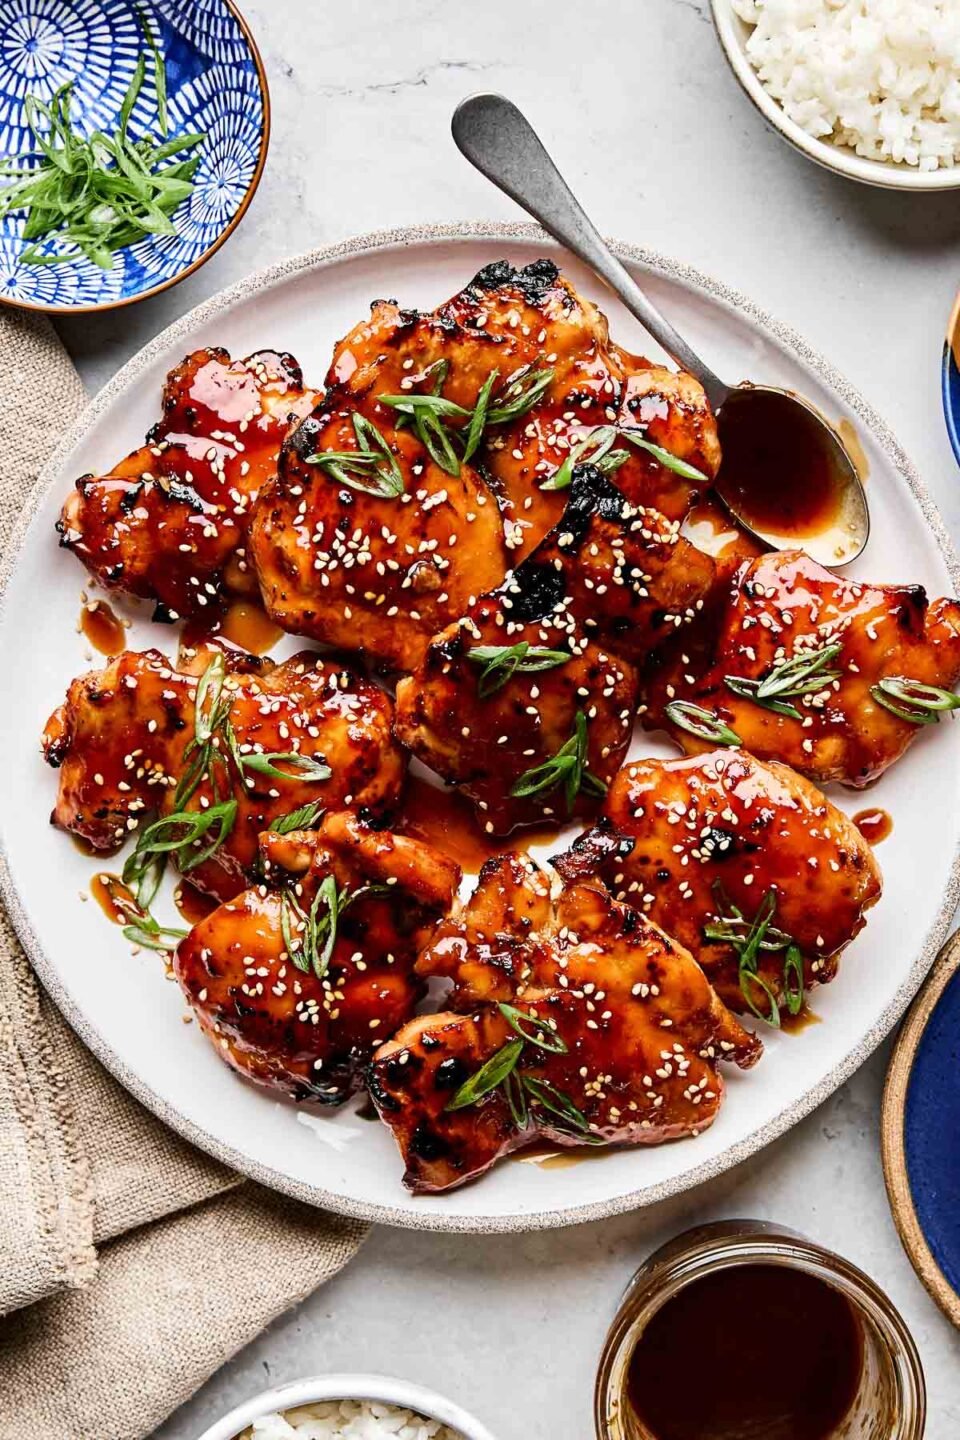
But growing up with the best of the best also means I have high standards. 😏 My ideal teriyaki chicken is juicy and tender but needs yakitori-esque char—those caramelized, grill-like edges that make Japanese BBQ so craveable. Without it, it’s just baked chicken—not real-deal teriyaki chicken!

While you can easily create those crispy bits using your grill, making teriyaki chicken in the oven is my go-to method all year round. The baked chicken thighs roast until juicy and finish under the broiler for those signature charred edges.
The whole operation is a hands-off, 30-minute sheet pan meal with the BEST sticky-sweet results, every single time.
Maximum Flavor, Minimal Effort
3 foolproof secrets to low-fuss, flavor-packed dinners, learned from years working in restaurants.

Since this is such a quick and simple recipe, using a high-quality sauce is a must—which is why I always use my Mom’s Homemade Teriyaki Sauce! You can make it in 15 minutes with just 6 pantry staple ingredients, like shoyu, sesame oil, brown sugar, garlic, and ginger. It infuses the chicken with bold umami flavor, and the sugars caramelize beautifully in the oven.
Prefer to use store-bought teriyaki sauce? Be sure to choose a high-quality bottled sauce that’s thin and drizzly, like Bachan’s. If your sauce is too thick or gloopy (as many gum-loaded store-bought versions are!), your chicken will take on a slimy texture as it bakes. Not good!
Baked Teriyaki Chicken Essentials

Bachan’s Japanese Barbecue Sauce
Buy Now → Buy Now →
  Buy Now →
Stainless Steel Measuring Cups & Spoons
Buy Now → Buy Now →
  Buy Now →
 How to Make Baked Teriyaki Chicken Thighs
My mom and I obsessively tested this recipe to ensure it met our sky-high standards. In the end, a bake-then-broil approach proved to be the best combination for juicy teriyaki chicken with smoky, caramelized edges.


Quick Serving Suggestions
Mom always serves teriyaki chicken plate lunch-style with Calrose rice, Hawaiian Mac Salad, and a simple sautéed green like spinach, cabbage, or bok choy to balance the smoky flavor with a bit of freshness.
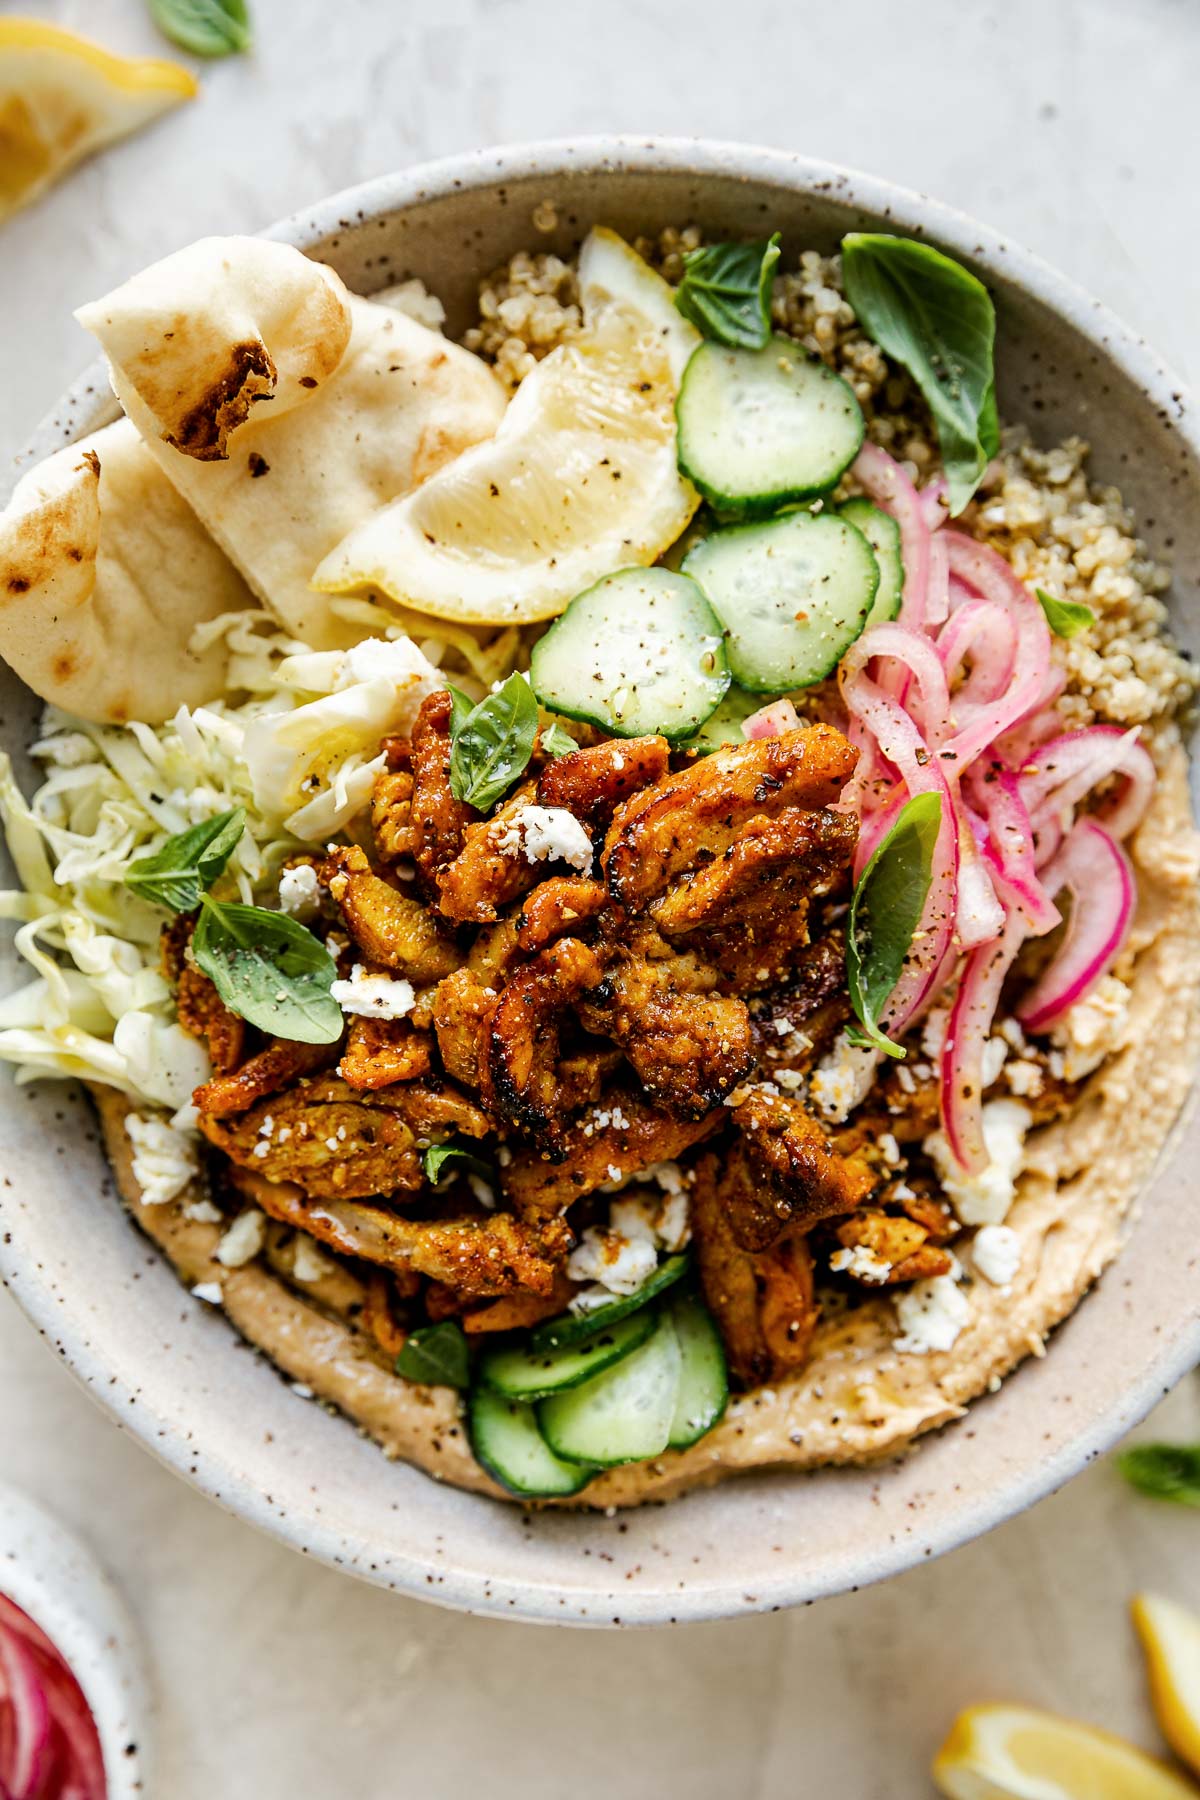
My favorite way to enjoy these baked teriyaki chicken thighs is in a veggie-loaded Teriyaki Chicken Bowl with an extra drizzle of sauce to bring everything together. It’s one of my go-to easy weeknight dinners!
I can’t wait for you to try these Easy Baked Teriyaki Chicken Thighs! If you do, be sure to let us know! Leave a comment with a star rating below. You can also snap a photo and tag @playswellwithbutter on Instagram. We LOVE seeing your PWWB creations! ♡ Happy cooking!
Print
Sticky-Sweet Baked Teriyaki Chicken Thighs (30 Minutes)
- Prep Time: 10 minutes
- Cook Time: 20 minutes
- Total Time: 30 minutes
- Yield: serves 4
- Category: Main Dishes, Chicken Recipes
- Method: Oven, Baked & Broiled
- Cuisine: Japanese-American, Asian-Inspired
- Diet: Gluten Free
Description
Made with a tried-and-true teriyaki sauce passed down from my Japanese grandma, these Easy Baked Teriyaki Chicken Thighs are juicy, sticky-sweet, and downright irresistible!
Quickly marinate the chicken while your oven preheats, bake it on a sheet pan until tender, and finish under the broiler for caramelized yakitori-style char that tastes like it came straight off the grill.
Ready in 30 minutes or less!
Ingredients
- nonstick cooking spray
- 2 pounds boneless, skinless chicken thighs or breasts (see Recipe Notes)
- ¾ cup teriyaki sauce, store-bought or homemade, divided (see Recipe Notes)
- 2 green onions, thinly sliced
- for serving, as desired: cooked rice, steamed vegetables, sautéed cabbage or bok choy, toasted sesame seeds, etc.
Instructions
- Season the chicken thighs: To a large bowl, add the chicken thighs and ½ cup of teriyaki sauce. Mix to coat the chicken in the teriyaki sauce well. Set aside to quickly marinate while the oven preheats, about 10 minutes.

- Prep: Meanwhile, as the chicken marinates, preheat the oven to 400 degrees F, arranging the oven racks such that one is in the center of the oven and one is 4-6 inches under the broiler. Line a rimmed baking sheet with foil for easy clean up. Spritz with nonstick cooking spray and set aside.
- Roast the teriyaki chicken thighs: Once the oven is preheated, transfer the marinated chicken to the prepared baking sheet. Be sure to arrange the chicken in a single layer. For prettiest results, start with the de-boned side of the chicken thighs facing up. Pour any remaining teriyaki sauce from the bowl over the chicken. Transfer to the center rack of the oven and bake for 15 minutes.
- Finish the under the broiler: Remove the baked teriyaki chicken from the oven and preheat the broiler to its highest setting. Flip the chicken thighs over, spooning any sauce from the bottom of the pan over top. Transfer the sheet pan to the oven, placing it on the top rack directly under the broiler. Broil 4-5 minutes, rotating the sheet pan halfway through, until the baked teriyaki chicken is golden, caramelized, and cooked through.
- Serve: Drizzle reserved teriyaki sauce and sprinkle green onions over the teriyaki chicken and serve as desired. At my house, we enjoy teriyaki chicken thighs in one of two ways: Hawaii plate lunch-style (alongside light and sticky Calrose rice, Mom’s Mac Salad, and a sautéed green like spinach, cabbage, or bok choy) or in a veggie-loaded Teriyaki Chicken Bowl. Enjoy!


Notes
Jess’ Tips and Tricks:
- Chicken thighs vs chicken breasts: I prefer using chicken thighs when I make teriyaki chicken, since they’re super flavorful and stay really juicy through baking and broiling, but you can swap them out with breasts if you prefer. If so, be sure to pound the chicken breasts out flat or butterfly them (slice in half lengthwise) to ensure they roast up evenly. Adjust cook times as needed to ensure the chicken is cooked through and skip broiling (Step 4) to avoid drying the leaner breast meat out.
- Best teriyaki sauce to use: All teriyaki sauce is not created equally! Many bottled versions are thickened with gums and starches, so they don’t bake up nicely. For best results, I suggest using my Mom’s Homemade Teriyaki Sauce recipe—you can whip up a batch in less than 15 minutes using pantry staple ingredients you likely already have in your kitchen. (If so, be sure to skip the cornstarch slurry step, or prepare a double batch to use half for marinating/baking and thicken the remaining half for serving.) If you prefer to use a store-bought teriyaki sauce, look for a high-quality bottled sauce with a nice, drizzly consistency—my preferred brand is Bachan’s; they’re Japanese-American owned and their signature family recipe has beautifully balanced flavor.
Storage and Reheating: Transfer cooled teriyaki chicken to an airtight container and store in the refrigerator for 3-4 days. Easily reheat on the stovetop or in the microwave until warmed through.
Follow along with Plays Well With Butter on Instagram, YouTube, Facebook, and Pinterest for more unfussy recipes that pack a big punch of flavor!


My first try was your Spam Mosubi, (Louie’s favorite snack!!) The recipe was easy to follow and the results were amazing!!! Thank you..Next it was your Shoya Chicken recipe..Awesome once again… I beleive the best so far was your Garlic Butter Shrimp, the shrimo was tender and So Flavorful. Chicken Katsu was also a big seller at dinner and again for lunch,with CalRose rice of course!!!
I look forward to your emails and recipes and can’t wait to try the next recipe always.
Thanks for making Hawiian (asian) food so user freiendly we love your Mom’s sauces as well…
Looking forward to more fun, Hawaiian cooking…..
Thanks,
Terri
Hi Terri, we’re so happy to hear that you have enjoyed so many of our Hawaii recipes! We love sharing them! Thank you so much for taking the time to leave such a kind review 🙂